在学习了RN的样式、组件和路由之后,我们就可以来尝试自己开发一款我们自己的App,本文我们结合实际生活中的需要,从零开始实战开发一个App,开发期间也遇到了大大小小的坑,分享给大家希望帮助大家规避。
项目源起
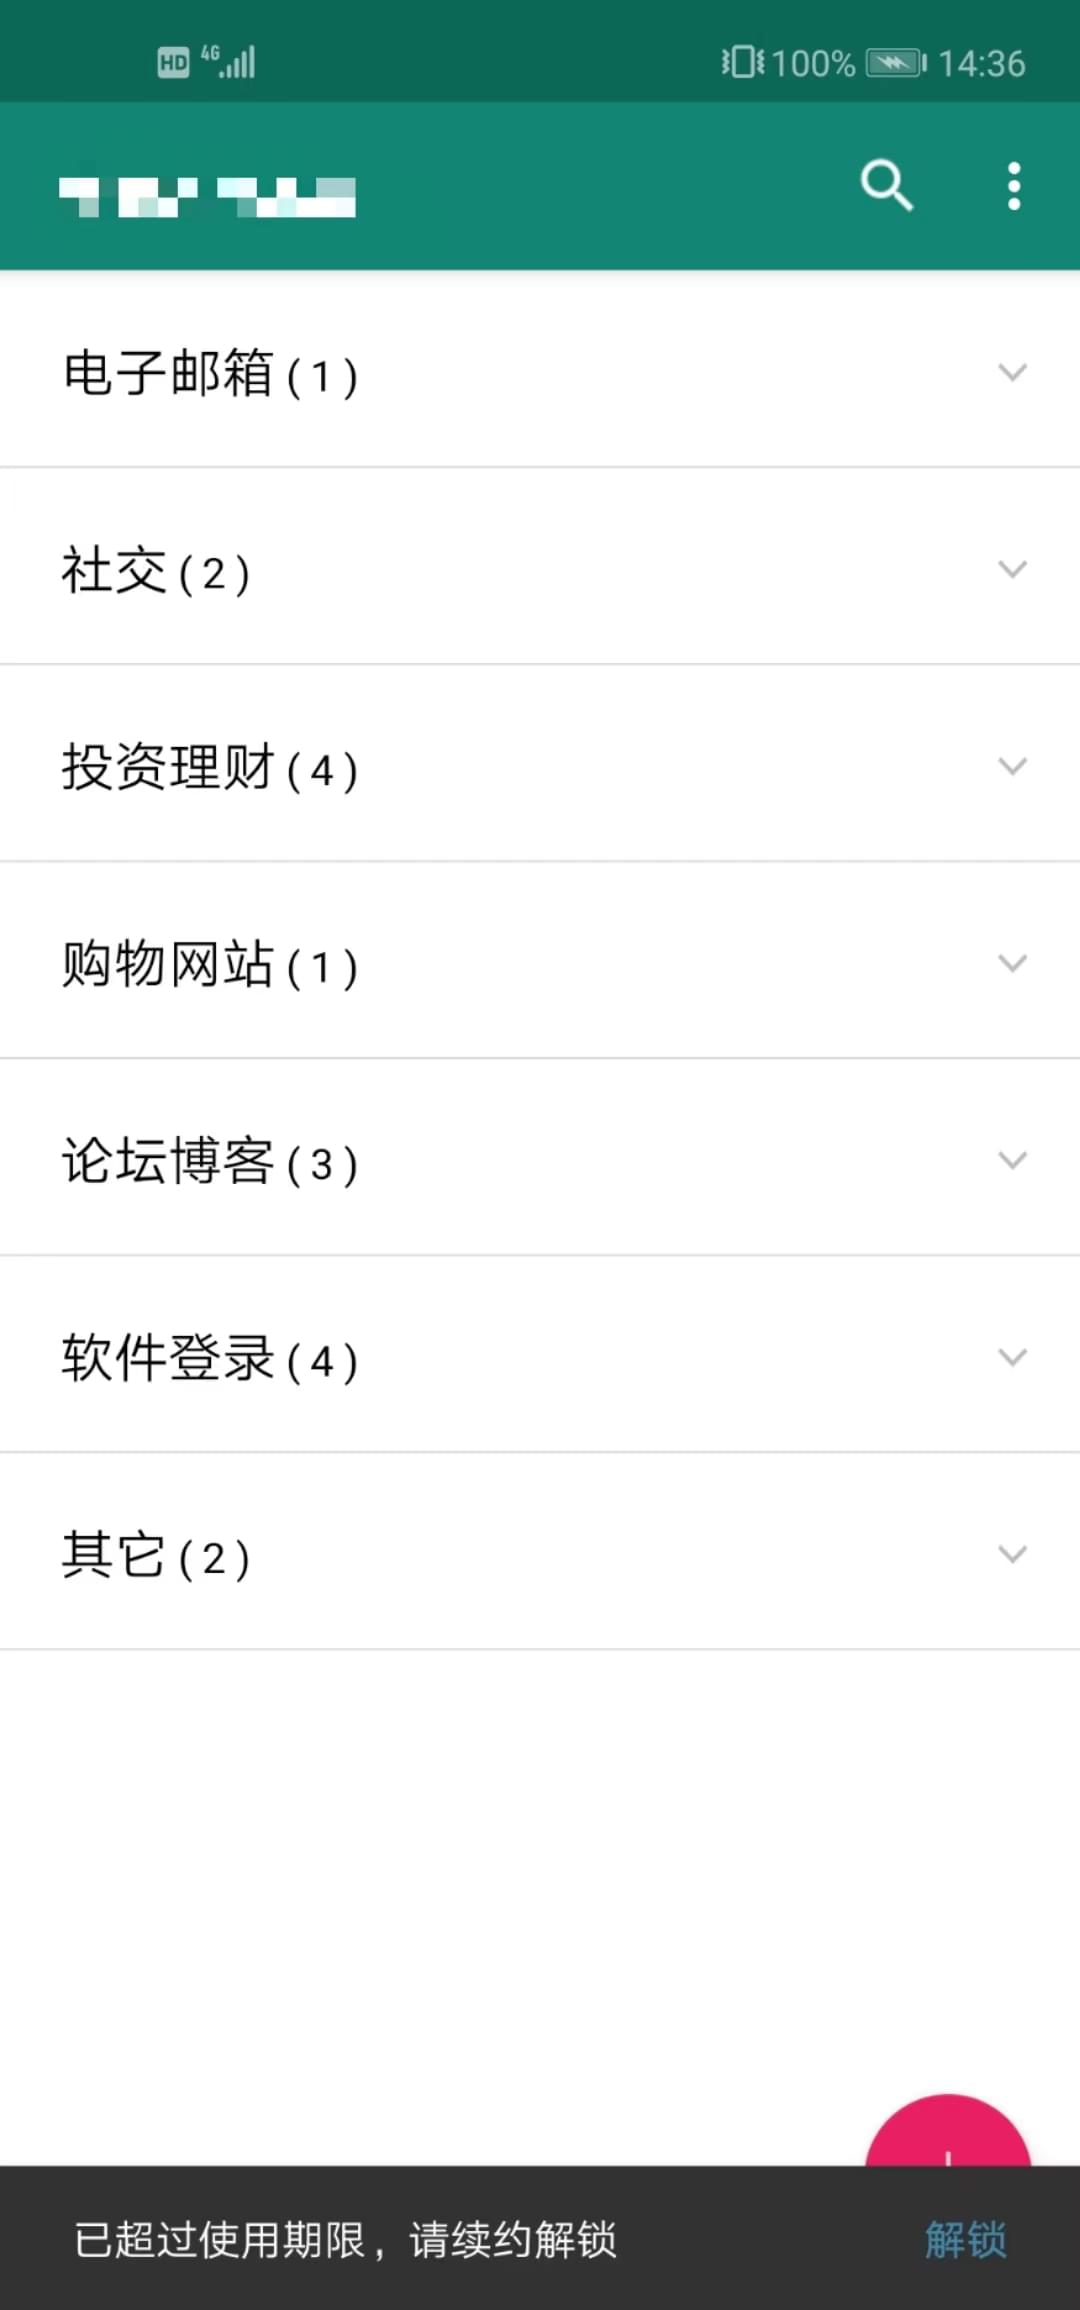
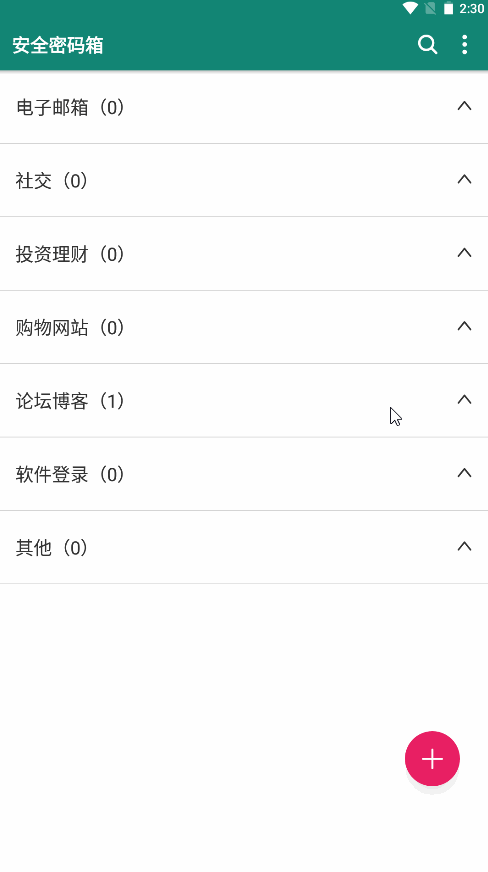
我们在浏览网站或者App时经常会注册各种各样的账号,手机自带的的密码保险箱功能只能保存App的密码,不能保存网页的;不同网站的注册账号和密码的规则还不一样,因此我们的需求也很简单,记录下每个网站或App注册的账号密码即可;笔者之前在应用市场下载过某密码箱的App,如下:
但是将重要的密码保存在别人的App上,尤其是涉及到自己隐私的密码,总觉得有些不放心,其实主要是这破App还开始收费了;因此我们可以利用之前学习的RN知识来开发一款自用的密码保险箱,既安全可靠又物美价廉,说干就干。
项目搭建
我们首先来搭建项目:
| react-native init rnSafeBox
|
这里RN的第一个小坑来了,RN的版本已经到了0.68以上,它强制使用JDK 11进行Android build;我们看下0.68版本最低要求:
- Node >= 14版本
- java jdk >= 11版本
但笔者装的版本比较早,是JDK1.8,因此我们搭建项目时需要留意自己的JDK版本;我们可以加上--version来指定RN的版本
| react-native init rnSafeBox --version 0.67.0
|
搭建后,我们加入常用的一些依赖,如图标和路由导航,这里不再赘述了,需要的小伙伴可以看下这篇文章:深入学习React Native之路由导航。组件库的话,我们选择了NativeBase@3.4.x,它的组件较为丰富且全面:
| yarn add native-base react-native-svg@12.1.1 react-native-safe-area-context@3.3.2
|
我们在项目下新建src目录作为我们代码的主要目录,然后建立以下结构:
| |- src
|- router
|- index.js
|- utils
|- index.js
|- storage.js
|- views
|- Login
|- Home
|- Passwd
|- Change
|
router存放我们的路由组件,这里由于不需要复杂的选项卡导航,我们直接使用堆栈导航即可;我们首先改造入口的App.js,加入NativeBase和导航的Provider容器:
| import {NativeBaseProvider} from 'native-base';
import {NavigationContainer} from '@react-navigation/native';
import Router from './src/router/index';
const App = () => {
return (
<SafeAreaProvider>
<NavigationContainer>
<NativeBaseProvider>
<Router></Router>
</NativeBaseProvider>
</NavigationContainer>
</SafeAreaProvider>
);
};
|
给我们的路由router/index.js导入页面:
1
2
3
4
5
6
7
8
9
10
11
12
13
14
15
16
17
18
19
20
21
22
23
24
25
26
27
28
| class Router extends Component {
render() {
return (
<Stack.Navigator>
<Stack.Screen
name="Login"
component={Login}
options={{headerShown: false}}
/>
<Stack.Screen
name="Home"
component={Home}
options={{title: '首页'}}
/>
<Stack.Screen
name="Passwd"
component={Passwd}
options={{title: '密码'}}
/>
<Stack.Screen
name="Change"
component={Change}
options={{title: '修改入口密码'}}
/>
</Stack.Navigator>
);
}
}
|
主要页面
首先我们来看下登录页面,登录页面比较简单,我们只需要一个输入框和确定按钮(省略其他组件代码):
1
2
3
4
5
6
7
8
9
10
11
12
13
14
15
16
17
18
19
20
21
22
23
24
25
26
27
| import {Sae} from 'react-native-textinput-effects';
class Login extends Component {
constructor(props) {
super(props);
this.state = {
now: '',
pwd: '',
};
}
clickSubmit() {}
render() {
const {pwd} = this.state;
return (
<Sae
value={pwd}
label={'入口密码'}
secureTextEntry={true}
iconClass={FontAwesomeIcon}
iconName={'lock'}
onChangeText={value => this.setState({pwd: value})}
/>
<View>
<Button onPress={() => this.clickSubmit()}>确定</Button>
</View>
)
}
}
|
这里我们用到react-native-textinput-effects组件,这是一个用纯js实现不同的炫酷效果的textinput组件库,实现的输入框效果如下:

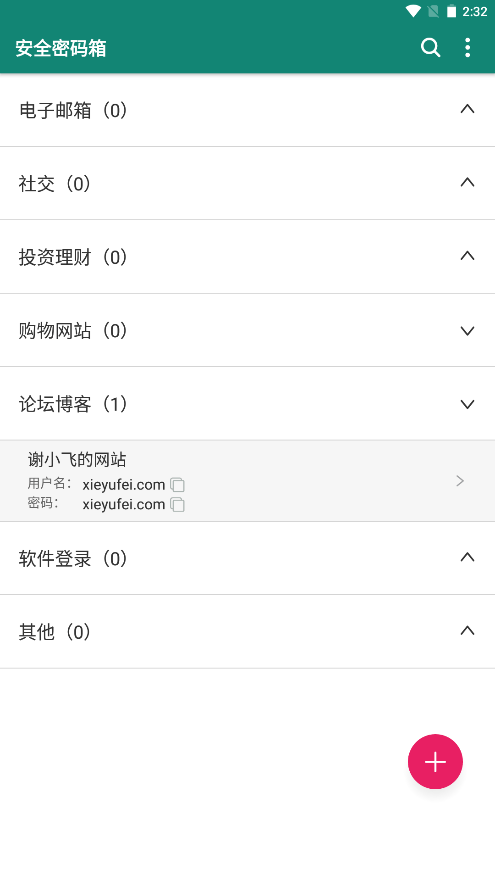
其次是我们的首页,用来展示账号密码的列表:
1
2
3
4
5
6
7
8
9
10
11
12
13
14
15
16
17
18
19
20
21
22
| class Home extends Component {
constructor() {
super();
this.state = {
list: [],
};
}
render() {
return (
<View style={styles.box}>
<ScrollView>
{list.map((item, index) => {
return <ListItem item={item} index={index}></ListItem>;
})}
</ScrollView>
<View style={styles.fixedAddBtn}>
<Icon name={"plus"} size={30} color="#fff" />
</View>
</View>
);
}
}
|
fixedAddBtn按钮用来点击跳转到新增账号密码的页面;我们将list中的每个数据封装成ListItem组件,方便后面进行动画效果的展示。效果如下:
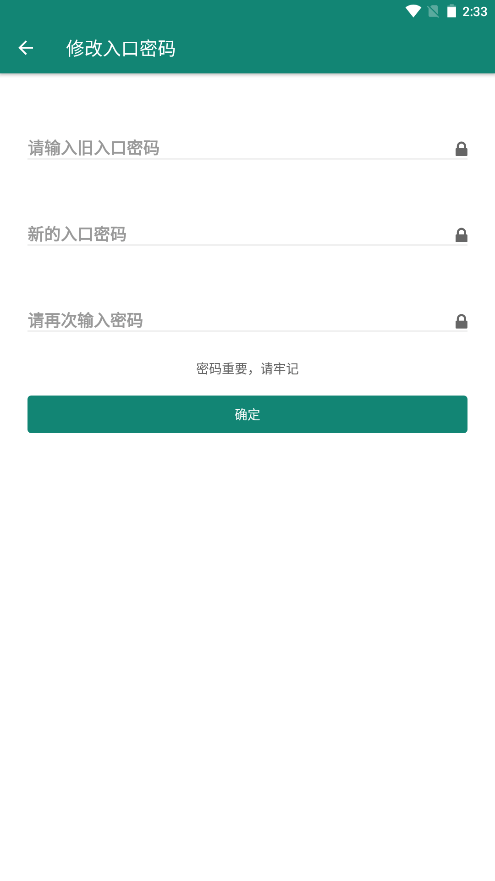
然后是修改入口密码页面Change,它分为两种情况,如果已经设置过了,就进行修改;如果没有设置,则可以设置新的密码。
1
2
3
4
5
6
7
8
9
10
11
12
13
14
15
16
17
18
19
20
21
22
23
24
| class Change extends Component {
render() {
const { showOldPwd } = this.state;
return (
<View>
{showOldPwd && (
<Sae
label={"请输入旧入口密码"}
onChangeText={(value) => this.setState({ oldPwd: value })}
/>
)}
<Sae
label={"新的入口密码"}
onChangeText={(value) => this.setState({ newPwd: value })}
/>
<Sae
label={"请再次输入密码"}
onChangeText={(value) => this.setState({ repeatPwd: value })}
/>
<Button>确定</Button>
</View>
);
}
}
|
最后是新增和编辑账号密码页面Passwd,它的部分代码如下:
1
2
3
4
5
6
7
8
9
10
11
12
13
14
15
16
17
18
19
20
21
22
23
24
25
26
27
28
29
30
31
32
33
34
35
| class Passwd extends Component {
showSheet() {
this.setState({
isVisible: true,
});
}
render() {
return (
<View style={styles.box}>
<TouchableWithoutFeedback onPress={() => this.showSheet()}>
<View>
<Text>密码类型</Text>
<Input isDisabled={true} value={pwdType} placeholder="请选择密码类型" />
</View>
</TouchableWithoutFeedback>
<View>
<Text>用户名</Text>
<Input
value={username}
placeholder="请输入用户名"
onChangeText={(value) => this.setState({ username: value })}
/>
</View>
<View>
<Text>密码</Text>
<Input
value={password}
placeholder="请输入密码"
onChangeText={(value) => this.setState({ password: value })}
/>
</View>
</View>
);
}
}
|
这里除了密码类型,其他字段(用户名、密码、标题、网址)等都是输入框,直接输入即可;密码类型点击后呈现下拉框,我们这里使用native-base的Actionsheet组件:
| <Actionsheet isOpen={isVisible} onClose={() => this.closeSheet()}>
<Actionsheet.Content>
{list.map((el, index) => {
return (
<Actionsheet.Item
key={index}
onPress={() => this.clickTypeItem(el, index)}
>
{el.name}
</Actionsheet.Item>
);
})}
</Actionsheet.Content>
</Actionsheet>;
|
Actionsheet效果如下:

路由改造
我们的页面框架已经基本搭建完成了,我们对路由组件进行一些改造,对登录状态进行区分;在登录成功后才能进入首页及后续页面,否则只能展示登录页面:
| <Stack.Navigator>
{isLogin ? (
<>
<Stack.Screen name="Home" component={Home} options={{ title: "首页" }} />
{/* 以及其他页面 */}
</>
) : (
<Stack.Screen
name="Login"
component={Login}
options={{ headerShown: false }}
/>
)}
</Stack.Navigator>
|
我们设置初始化页面为登录页,同时登录页不需要展示header;再给其他页面的header设置统一的背景颜色和字体颜色:
| <Stack.Navigator
initialRouteName="Login"
screenOptions={{
headerStyle: {
backgroundColor: '#128574',
},
headerTintColor: '#fff',
headerTitleStyle: {
fontWeight: 'normal',
},
}}>
</Stack.Navigator>
|
现在我们需要通过isLogin变量来控制路由的变化,由于登录操作时在登录页面判断的,我们可以通过全局的event bus来进行监听,在页面销毁时不要忘记移除监听事件:
1
2
3
4
5
6
7
8
9
10
11
12
13
14
15
16
17
| import bus from '../utils/bus.js';
class Router extends Component {
constructor(props) {
this.getLogin = this.getLogin.bind(this);
}
getLogin() {
this.setState({
isLogin: true,
});
}
componentDidMount() {
bus.addListener("login", this.getLogin);
}
componentWillUnmount() {
bus.removeListener("login", this.getLogin);
}
}
|
bus.js的代码也很简单,直接调用events库:
| import {EventEmitter} from 'events';
const eventBus = new EventEmitter();
export default eventBus;
|
存取数据
数据的存和取是我们这个App的核心功能,我们用到Async Storage这个库,它是一个给RN进行数据存储的依赖库,首先进行安装:
| npm install @react-native-async-storage/async-storage
yarn add @react-native-async-storage/async-storage
|
它的用法也很简单,和LocalStorage的API有点类似,都是以字符串形式存储键和值,我们把它封装到utils/storage.js,方便调用:
1
2
3
4
5
6
7
8
9
10
11
12
13
14
15
16
17
18
19
20
21
22
23
24
25
26
27
28
29
30
31
32
33
| import AsyncStorage from '@react-native-async-storage/async-storage';
const getData = async (key = '') => {
try {
return await AsyncStorage.getItem(`@storage_${key}`);
} catch (e) {return ''; }
};
const storeData = async (key = '', value = '') => {
try {
await AsyncStorage.setItem(`@storage_${key}`, value);
} catch (e) {}
};
const storeObjectData = async (key, obj) => {
if (typeof obj !== 'object') {
console.warn('obj is not a object');
return;
}
try {
await AsyncStorage.setItem(`@storage_${key}`, JSON.stringify(obj));
} catch (e) {}
};
const getObjectData = async (key = '') => {
let res = await AsyncStorage.getItem(`@storage_${key}`);
if (res) {
try {
return JSON.parse(res);
} catch (error) {
return {};
}
} else {
return {};
}
};
|
我们封装了两组APi,一组是直接存取值的,另一组是可以存取对象的。这样,我们在登录页时,先把存储的入口密码entrance取出来,如果不存在,则直接进入首页;如果存在,在下面点击登录按钮时就将用户输入的值进行比较即可:
1
2
3
4
5
6
7
8
9
10
11
12
13
14
15
16
17
18
19
20
21
22
23
24
25
26
27
28
| import { getData } from "../../utils/storage";
class Login extends Component {
async componentDidMount() {
await this.getStorage();
}
async getStorage() {
let now = await getData("entrance");
if (typeof now === "string" && now) {
this.setState({ now });
} else {
bus.emit("login");
}
}
clickSubmit() {
const { pwd, now } = this.state;
if (!pwd) {
showToast("请输入入口密码");
return;
}
if (pwd !== now) {
showToast("入口密码不正确");
return;
}
bus.emit("login");
}
}
|
在设置入口密码的Change页面,我们对新旧密码进行一系列校验,然后直接保存到storage中即可,这里不再赘述了。
在首页,我们在updateList函数中将storage中保存的每一条密码取出来放到list中进行展示,但是在新增或者编辑storage中的密码之后,需要及时重新调用这个函数更新list数组,我们在RN路由导航中的导航的生命周期中说过,可以监听focus事件来判断页面是否重新聚焦:
| class Home extends Component {
async updateList() {}
async componentDidMount() {
await this.updateList();
this._focus = this.props.navigation.addListener("focus", async () => {
await this.updateList();
});
}
componentWillUnrmount() {
this._focus();
}
}
|
优化
我们整个App的存储和读取的功能已经基本完成,基本功能也能够使用了,下面对界面和功能进行一些优化。
新增按钮加阴影
在原版的App中,新增按钮有一个阴影的效果,阴影效果也是一个很常见的需求;在CSS3中,我们可以直接通过box-shadow属性实现,在RN中iOS平台支持以下shadow属性:
| <View
style={{
shadowOffset: {
width: 10,
height: 10,
},
shadowOpacity: 0.8,
shadowRadius: 1.5,
}}
/>
|
在安卓端可以通过elevation属性,但是两者表现形式差别很大;因此我们引入第三方的react-native-shadow,它是利用react-native-svg画出svg阴影,因此两端效果比较一致;我们同时安装这两个依赖:
| yarn add react-native-shadow
yarn add react-native-svg
|
然后给fixedAddBtn套一层BoxShadow组件:
1
2
3
4
5
6
7
8
9
10
11
12
13
14
15
16
17
18
19
20
21
22
| import { BoxShadow } from "react-native-shadow";
<BoxShadow
setting={{
width: 30,
height: 30,
color: "#000",
border: 20,
radius: 15,
opacity: 0.1,
x: 0,
y: 25,
style: {
justifyContent: "center",
alignItems: "center",
flex: 1,
},
}}
>
<View style={styles.fixedAddBtn}>
<Icon name={"plus"} size={30} color="#fff" />
</View>
</BoxShadow>;
|
复制功能
我们点击复制按钮可以直接复制账号或者密码到剪切板;RN已经将Clipboard功能从核心代码中分离出来,我们需要安装一下第三方的模块:
| yarn add @react-native-clipboard/clipboard
|
调用Clipboard.setString,复制到剪切板,调用await Clipboard.getString()获取剪切板的内容;我们这边使用setString即可:
| import Clipboard from "@react-native-clipboard/clipboard";
class Home extends Component {
clickCopy(text) {
Clipboard.setString(text);
}
render() {
return (
<view>
<Text>用户名:</Text>
<TouchableOpacity onPress={() => this.clickCopy(username)}>
<Text>{username}</Text>
</TouchableOpacity>
</view>
);
}
}
|
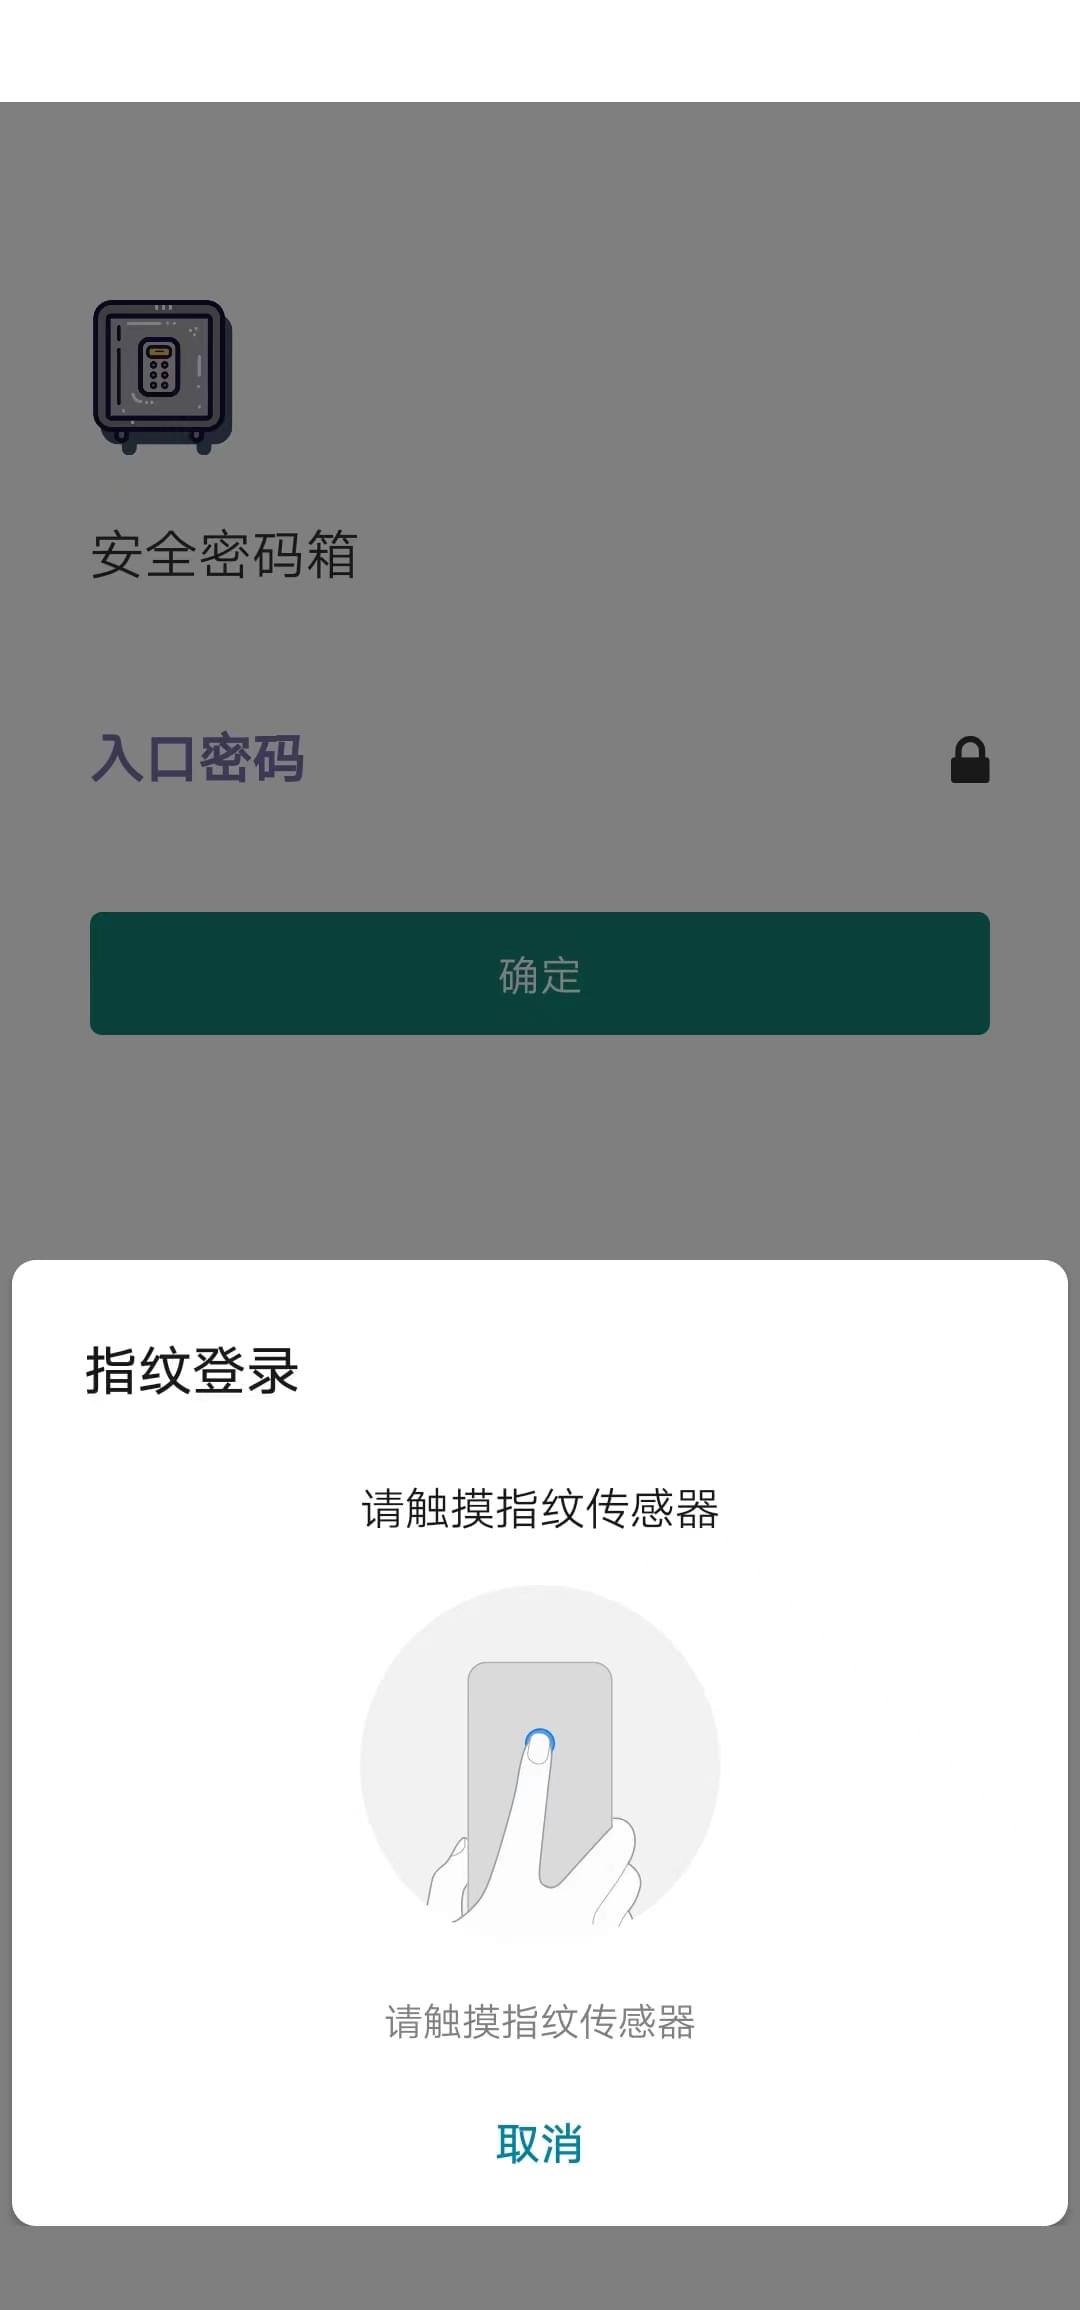
指纹识别登录
现在的智能手机一般都带有指纹识别的传感器,我们可以利用指纹模块来方便用户登录;React Native Fingerprint Scanner是一个RN库,用于使用指纹对用户进行身份验证;它提供了一个默认视图,提示用户将手指放在传感器上进行扫描。
我们根据安装教程安装该依赖后,发现它的文档看起来很多,很唬人,但是核心的API只有两个,首先是isSensorAvailable,用来判断传感器是否可用,如果手机没有设置指纹则不可用,该函数直接报错,因此通过try/catch进行包装:
| class Login extends Component {
async checkSensorsAvailable() {
let flag = false;
try {
let biometryType = await FingerprintScanner.isSensorAvailable();
flag = true;
} catch (error) {}
return flag;
}
}
|
在安卓端biometryType值如果可用的话为Biometrics,iOS端为’Touch ID’和’Face ID’,目前我们只考虑安卓端;判断后我们就真正可以调用指纹模块了,authenticate函数自动唤起指纹识别模块的模态框,我们填入title和description一些描述文案来引导用户:
| class Login extends Component {
async scanAuth() {
let flag = false;
try {
let res = await FingerprintScanner.authenticate({
title: "指纹登录",
description: "请触摸指纹传感器",
cancelButton: "取消",
});
if (res === true) {
flag = true;
}
} catch (error) {}
return flag;
}
}
|
我们在页面初始化时,如果设置了入口密码,则进行指纹识别校验,自动弹出模态框,验证成功后跳转首页,同时不要忘了在页面销毁时调用release释放指纹模块的资源:
1
2
3
4
5
6
7
8
9
10
11
12
13
14
15
16
17
18
| class Login extends Component {
async componentDidMount() {
if (this.state.now) {
let available = await this.checkSensorsAvailable();
if (available) {
let auth = await this.scanAuth();
if (auth) {
bus.emit("login");
}
}
}
}
componentWillUnmount = () => {
FingerprintScanner.release();
};
}
|
指纹识别效果如下:

放错图了,应该是下面这张:
箭头添加动效
我们在首页的列表展开时,给小箭头一个旋转的动画效果;RN中提供了Animated API来实现动画,可以简洁的实现各种动画和交互方式,并且具备极高的性能,我们从RN中导出模块:
1
2
3
4
5
6
7
8
9
10
11
12
13
14
15
16
17
18
19
20
21
22
23
| import { Animated } from "react-native";
class ListItem {
constructor() {
const rotateDeg = new Animated.Value(0);
this.state = {
rotateDeg: rotateDeg,
};
}
render() {
const { rotateDeg } = this.state;
const rotate = rotateDeg.interpolate({
inputRange: [0, 1],
outputRange: ["0deg", "180deg"],
});
return (
<View>
<Animated.View style={{ transform: [{ rotate: rotate }] }}>
<Icon name="up" size={20} color="#333" />
</Animated.View>
</View>
);
}
}
|
我们首先使用new Animated.Value创建一个值,在render函数中使用了一个interpolate()插值函数,用于将输入值范围转换为输出值范围,这里是将[0, 1]输入转为[“0deg”, “180deg”]输出。
1
2
3
4
5
6
7
8
9
10
11
12
13
14
15
16
17
18
19
20
| const ANIMATE_DURATION = 200;
class ListItem {
clickListItem(item, index) {
if (item.toggle) {
Animated.timing(this.state.rotateDeg, {
toValue: 0,
duration: ANIMATE_DURATION,
useNativeDriver: true,
}).start();
} else {
Animated.timing(this.state.rotateDeg, {
toValue: 1,
duration: ANIMATE_DURATION,
useNativeDriver: true,
}).start();
}
}
}
|
当点击展开列表元素时,调用Animated.timing,使得值按照过渡曲线随时间变化而变化,duration设置动画的执行时间,最终效果如下:
打包及一些问题
我们的App开发完成后,就需要进行打包了,这里简单的看下笔者遇到的一些坑,希望能够让大家在开发时规避类似的坑。
打包apk后运行闪退
我们开发时没有问题,但打包成apk文件后,兴冲冲的安装,结果现实泼了一盆冷水,运行直接闪退;搜索一番后,说是index.android.bundle文件没正常生成所致,我们运行一下打包命令,首先进行js文件的打包,再运行./gradlew assembleRelease打包:
| react-native bundle --platform android --dev false --entry-file index.js --bundle-output android/app/src/main/assets/index.android.bundle --assets-dest android/app/src/main/res/
|
Duplicate resources
打包时还会遇到Duplicate resources报错,翻译过来就是重复资源:
| :app:mergeReleaseResources FAILED
Execution failed for task ':app:mergeReleaseResources'.
/android/app/build/generated/res/react/release/drawable-XXXX: Error: Duplicate resources
|
网上说是打包问题,打开node_modules/react-native/react.gradle文件,在doFirst代码段后面新增以下代码:
1
2
3
4
5
6
7
8
9
10
11
12
13
14
15
16
17
18
19
20
21
22
23
24
25
26
| doFirst{ ... }
# 新增
doLast {
def moveFunc = { resSuffix ->
File originalDir = file("${resourcesDir}/drawable-${resSuffix}")
if (originalDir.exists()) {
File destDir = file("$buildDir/../src/main/res/drawable-${resSuffix}")
ant.move(file: originalDir, tofile: destDir)
}
}
def moveRawFunc = { dir ->
File originalDir = file("${resourcesDir}/${dir}")
if (originalDir.exists()) {
File destDir = file("$buildDir/../src/main/res/${dir}")
ant.move(file: originalDir, tofile: destDir)
}
}
moveFunc.curry("ldpi").call()
moveFunc.curry("mdpi").call()
moveFunc.curry("hdpi").call()
moveFunc.curry("xhdpi").call()
moveFunc.curry("xxhdpi").call()
moveFunc.curry("xxxhdpi").call()
moveRawFunc.curry("raw").call()
}
|
参考:
Reanimated报错
react-native-reanimated依赖报错:
| error: node_modules/react-native-reanimated/src/index.ts: /Users/tomekzaw/RNOS/Issue3397/node_modules/react-native-reanimated/src/index.ts: Export namespace should be first transformed by `@babel/plugin-proposal-export-namespace-from`.
5 | export * from './reanimated1';
6 | export * from './reanimated2';
> 7 | export * as default from './Animated';
| ^^^^^^^^^^^^
|
打开babel配置文件babel.config.js,新增如下插件:
| module.exports = {
presets: ['module:metro-react-native-babel-preset'],
+ plugins: ['react-native-reanimated/plugin'],
};
|
参考:https://github.com/software-mansion/react-native-reanimated/issues/3410
FingerprintScanner
react-native-fingerprint-scanner打包时报如下错误:
| FAILURE: Build failed with an exception.
* What went wrong:
Execution failed for task ':app:checkDebugAarMetadata'.
> Could not resolve all files for configuration ':app:debugRuntimeClasspath'.
> Could not find com.wei.android.lib:fingerprintidentify:1.2.6.
Required by:
project :app > project :react-native-fingerprint-scanner
|
build.gradle新增jcenter()
参考:https://github.com/hieuvp/react-native-fingerprint-scanner/issues/192
总结
我们的自研App到这里基本就结束了,该有的功能也都有了;当然在开发过程中也遇到了不少坑,好几个依赖包安装和运行中都出现了大大小小不同的问题,上面的bug列表只是列举了一些典型的问题;只要我们利用好Github和Stack Overflow,总能找到解决方案。

有兴趣的小伙伴可以到Github给个Star,有好的想法和改进建议也欢迎提给我;本App只将数据保存在本地,没有上传服务器,因此大家可以放心使用;如果想要体验,请在公众号【前端壹读】后台回复关键词安全密码箱即可获取App的安装包。