在生活和工作中,我们经常需要用到幻灯片进行演示或者汇报工作等,传统的幻灯片在排版、代码、动效和多媒体等方面操作起来需要一定的基础;而Reveal.js提供了简单易上手的方案,将幻灯片搬到网页中,提供了丰富的模板和效果,让我们来看下如何来制作一个精美的网页幻灯片吧。
一、Reveal.js是什么 Reveal.js是一个运行在浏览器上的幻灯片展示框架,我们可以在任何浏览器上展示我们想要的幻灯片,并且可以自己定义行为、动画等。
reveal.js是一个开源的HTML展示框架。它是一种工具,可让任何拥有Web浏览器的人免费创建功能齐全且精美的演示文稿。
和传统的幻灯片相比,Reveal.js有以下优势:
界面优美:UI风格简介优美,对数学公式、代码、多媒体扩展支持。
运行简单:因为是一个HTML文件,那么只要双击,就能在浏览器中展示。也可以通过url分享。
功能强大:因为是在浏览器中运行的,可以用HTML+CSS+JS,做各种想要的东西
安装 首先我们需要将reveal.js克隆到本地:
> git clone https://github.com/hakimel/reveal.js.gitcd reveal.js && npm install
这样就将整个仓库作为一个静态资源服务器启动了,开发服务器的默认端口8000;可以使用port参数切换到不同的端口:
我们可以复制一份仓库中的index.html,新建自己的html,就可以通过地址访问到我们自己的幻灯片了;或者将仓库中的dist和plugin两个文件夹拷贝到自己仓库的静态资源中,通过外链方式引入。
第二种方式是通过npm的方式进行安装,不过需要注意的是,reveal.js只是针对浏览器环境:
npm install reveal.js
安装后我们就可以将reveal.js作为模块引入了:
import Reveal from 'reveal.js' ;import Markdown from 'reveal.js/plugin/markdown/markdown.esm.js' ;let deck = new Reveal ({plugins : [ Markdown ]initialize ();
但是样式并不会随模块一起引入,我们还需要在页面中包含样式:
<link rel ="stylesheet" href ="/node_modules/reveal.js/dist/reveal.css" > <link rel ="stylesheet" href ="/node_modules/reveal.js/dist/theme/black.css" >
编辑内容 安装完成后,我们就可以来编辑幻灯片内容了,他的内容就是一个HTML文件,来看一下它的标准结构:
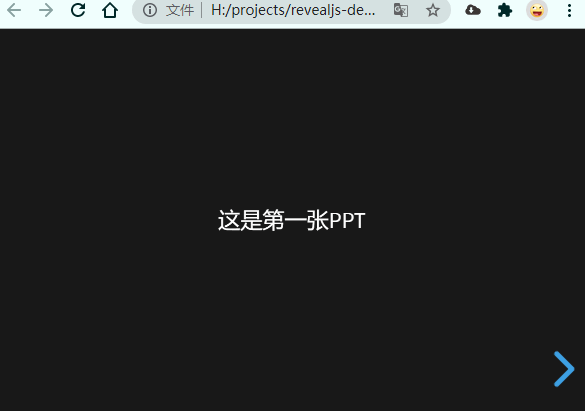
1 2 3 4 5 6 7 8 9 10 11 12 13 14 15 16 17 18 <html > <head > <link rel ="stylesheet" href ="dist/reveal.css" > <link rel ="stylesheet" href ="dist/theme/black.css" > </head > <body > <div class ="reveal" > <div class ="slides" > <section > 这是第一张幻灯片</section > <section > 这是第二张幻灯片</section > </div > </div > <script src ="dist/reveal.js" > </script > <script > </script > </body > </html >
我们看到页面的层级为`.reveal > .slides > section``,位于最里面的section元素就是我们需要呈现出来的幻灯片,可以是连续多张。
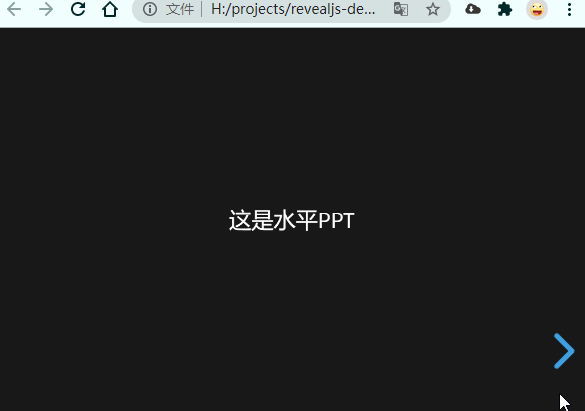
如果有某张幻灯片我们需要对其内容进行更详细的阐述,那么可以通过垂直幻灯片的方式,将多个section元素包含在一页幻灯片内容中:
<div class ="reveal" > <div class ="slides" > <section > 这是水平幻灯片</section > <section > <section > 这是第一张垂直幻灯片</section > <section > 这是第二张垂直幻灯片</section > </section > </div > </div >
滑动效果 我们切换幻灯片时,默认都是从右到左进行幻灯片的切换过渡,默认是滑动的效果;我们可以在每页幻灯片上添加data-transition属性来制动过渡的效果:
<div class ="slides" > <section data-transition ="zoom" > 第一页幻灯片</section > <section data-transition ="fade" > 第二页幻灯片</section > <section data-transition ="convex" > 第三页幻灯片</section > <section > 第四页幻灯片</section > </div >
下面是所有过渡效果的列表:
过渡名称
影响
none
立即切换背景
fade
淡入淡出
slide
在背景之间滑动(默认)
convex
以凸角滑动
concave
以凹角滑动
zoom
将传入的幻灯片向上缩放,使其从屏幕中心向内增长
如果我们想统一改变默认的过渡效果,在全局初始化的时候配置backgroundTransition属性:
Reveal .initialize ({backgroundTransition : 'slide'
内置主题 在上面代码中我们发现,引入了两个不同的css,第一个reveal.css是依赖的基础的样式文件,而引入的第二个theme/black.css就是在基础样式上的主题样式,可以根据我们自己的喜好,选择不同主题;Revealjs也内置了以下主题:
主题名称
主题效果
black
黑色背景、白色文本、蓝色链接(默认)
white
白色背景,黑色文字,蓝色链接
league
灰色背景,白色文本,蓝色链接
beige
米色背景、深色文本、棕色链接
sky
蓝色背景,细的深色文本,蓝色链接
night
黑色背景,粗白文本,橙色链接
serif
卡布奇诺背景,灰色文本,棕色链接
simple
白色背景,黑色文字,蓝色链接
solarized
奶油色背景、深绿色文本、蓝色链接
blood
深色背景,厚实的白色文本,红色链接
moon
深蓝色背景,粗灰色文本,蓝色链接
需要更改主题,我们只需要从theme中引入对应主题的css即可。
Markdown支持 Revealjs也支持使用Markdown来编写幻灯片内容,对于简单的内容,会更加方便简洁;首先我们需要引入Markdown的插件:
<script src ="plugin/markdown/markdown.js" > </script > <script > </script >
然后将Markdown编写的内容放到section > textarea中,同时需要在标签上加上特殊的属性进行标识:
<div class ="slides" > <section data-markdown > <textarea data-template > </textarea > </section > </div >
不过要注意的是,Markdown语法对空格缩进和换行符(避免连续中断)的检测很严格。
背景 一般情况下,我们的背景颜色是跟随主题的,我们可以通过在每页上设置data-background属性,来手动的设置某页幻灯片的背景颜色。
<div class ="slides" > <section > <h2 > 我是第一页</h2 > </section > <section data-background-color ="aquamarine" > <h2 > 我是第二页</h2 > </section > <section data-background-color ="rgb(70, 70, 255)" > <h2 > 我是第三页</h2 > </section > </div >
除了设置背景纯色,我们还可以设置为背景图片
<div class ="slides" > <section data-background-image ="./1.jpg" > <h2 > 我是第一页</h2 > </section > <section data-background-image ="./2.jpg" > <h2 > 我是第二页</h2 > </section > <section data-background-image ="./3.jpg" > <h2 > 我是第三页</h2 > </section > </div >
背景图片支持以下属性:
参数
默认
描述
data-background-image
要显示的图像的 URL
data-background-size
cover
背景图像大小
data-background-position
center
背景图像位置
data-background-repeat
no-repeat
背景图像重复
data-background-opacity
1
0-1 范围内背景图像的不透明度。0 是透明的,1 是完全不透明的。
自动动画 有些幻灯片中我们想实现一些简单的动画效果,比如渐变、滑动等;Reveal.js会自动为幻灯片中的元素设置动画效果;我们需要做的就是在相邻的两页section元素上添加data-auto-animate属性,这样Reveal.js会为所有匹配的元素设置动画。
<div class ="slides" > <section data-auto-animate > <h1 > 自动动画</h1 > </section > <section data-auto-animate > <h1 style ="margin-top: 100px; color: red;" > 自动动画</h1 > </section > <section data-auto-animate > <h1 style ="margin-top: 200px; color: blue;" > 自动动画</h1 > </section > </div >
我们看一个简单的例子,在页面上的h1标签,我们在不同幻灯片中设置了不同的样式,Reveal.js会自动为这个元素设置动画效果。
对于幻灯片上新增或者删除的元素,Reveal.js在排列内容时也会自动为其添加动画效果:
1 2 3 4 5 6 7 8 9 10 11 12 13 14 15 16 17 18 19 20 21 22 23 24 25 26 <div class ="slides" > <section data-auto-animate > <h3 > Reveal.js的优点</h3 > </section > <section data-auto-animate > <h3 > Reveal.js的优点</h3 > <ul > <li > 界面优美</li > </ul > </section > <section data-auto-animate > <h3 > Reveal.js的优点</h3 > <ul > <li > 界面优美</li > <li > 运行简单</li > </ul > </section > <section data-auto-animate > <h3 > Reveal.js的优点</h3 > <ul > <li > 界面优美</li > <li > 运行简单</li > <li > 功能强大</li > </ul > </section > </div >
我们可以用ul > li的布局来生成多条排列整齐的论述列表,每页幻灯片内容都有新增的列表内容;Reveal.js会自动为元素的增加和删减添加动画。
那么Reveal.js是如何来自动匹配相同的元素的呢?对于文本元素,如果节点的类型和文本内容相同,我们就认为它是相同的,对于图片、视频和iframe等多媒体元素,Reveal.js通过比较他们的src属性。
回到我们最开始的那个动画例子,如果我们将文本内容进行改变,那么动画效果就会失效;在自动匹配元素不可行的情况下,我们可以在元素上添加data-id属性来强制进行动画效果,这样Reveal.js就会优先考虑元素的data-id属性:
<div class ="slides" > <section data-auto-animate > <h1 > 自动动画</h1 > </section > <section data-auto-animate > <h1 data-id ="box" style ="margin-top: 100px; color: red;" > 自动动画1</h1 > </section > <section data-auto-animate > <h1 data-id ="box" style ="margin-top: 200px; color: blue;" > 自动动画2</h1 > </section > </div >
我们看到第一个动画到第二个动画之间,由于自动匹配失效,因此没有动画;第二个动画到第三个动画之间由于我们强制加上了data-id属性,因此动画效果依然是生效的。
有时候我们会存在多个动画,相邻的动画有可能会互相干扰,可以通过data-auto-animate-id和data-auto-animate-restart对动画进行分组。
我们可以对相邻分组的幻灯片上加上data-auto-animate-id属性,属性的值可以是任意的,相同组保证值相同即可;这样,相邻的幻灯片会识别相同的id进行动画效果。
1 2 3 4 5 6 7 8 9 10 11 12 13 14 15 16 17 18 19 20 <div class ="slides" > <section data-auto-animate > <h1 > 第一组动画</h1 > </section > <section data-auto-animate > <h1 style ="color: #3B82F6;" > 第一组动画</h1 > </section > <section data-auto-animate data-auto-animate-id ="two" > <h1 > 第二组动画</h1 > </section > <section data-auto-animate data-auto-animate-id ="two" > <h1 style ="color: #10B981;" > 第二组动画</h1 > </section > <section data-auto-animate data-auto-animate-id ="three" > <h1 > 第三组动画</h1 > </section > <section data-auto-animate data-auto-animate-id ="three" > <h1 style ="color: #EC4899;" > 第三组动画</h1 > </section > </div >
如果同一组的幻灯片比较多,我们需要加上很多的id,上面的方式显得比较繁琐;因此Reveal.js提供另一种控制动画的方式:data-auto-animate-restart属性;这个属性会阻止上一张幻灯片和本组幻灯片之间的动画效果(即使他们有相同的id)。
1 2 3 4 5 6 7 8 9 10 11 12 13 14 15 16 17 18 19 20 <div class ="slides" > <section data-auto-animate > <h1 > 第一组动画</h1 > </section > <section data-auto-animate > <h1 style ="color: #3B82F6;" > 第一组动画</h1 > </section > <section data-auto-animate data-auto-animate-restart > <h1 > 第二组动画</h1 > </section > <section data-auto-animate > <h1 style ="color: #10B981;" > 第二组动画</h1 > </section > <section data-auto-animate data-auto-animate-restart > <h1 > 第三组动画</h1 > </section > <section data-auto-animate > <h1 style ="color: #EC4899;" > 第三组动画</h1 > </section > </div >
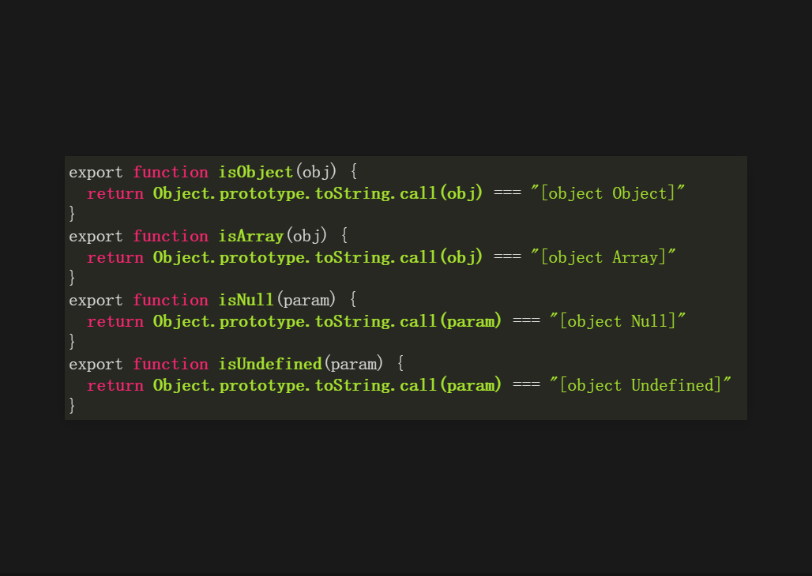
代码 Reveal.js在呈现代码方面也比普通的PPT更有优势,可以显示语法突出显示的代码,这个功能需要引入highlight.js插件;我们写的代码需要包含在pre > code标签中:
1 2 3 4 5 6 7 8 9 10 11 12 13 14 15 16 17 18 <div class ="slides" > <section > <pre > <code data-trim data-noescape > </code > </pre > </section > </div >
然后引入highlight.js插件,插件中默认包含了monokai.css的样式:
<link rel ="stylesheet" href ="./plugin/highlight/monokai.css" /> <body > </body > <script src ="./plugin/highlight/highlight.js" > </script > <script > </script >
我们可以在highlight.js 的demo中找到更多的高亮主题。
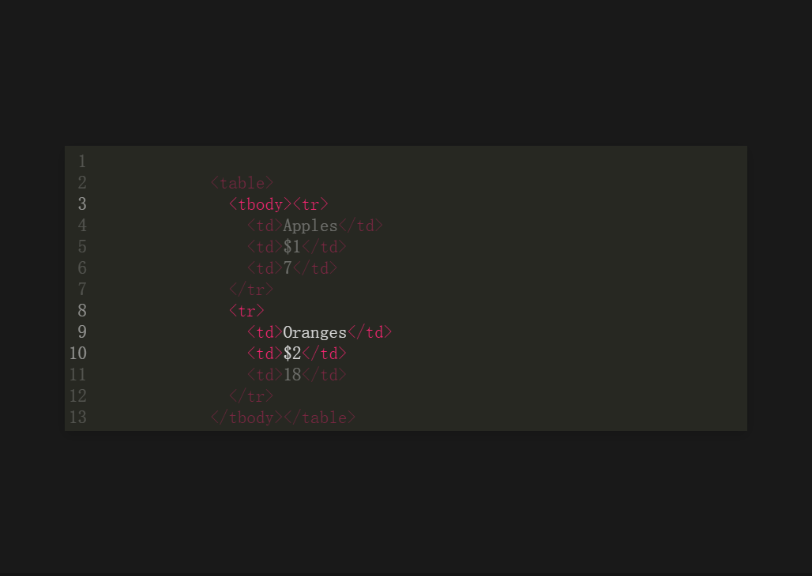
通过在code标签添加data-line-numbers属性,可以启用代码的行号;如果要突出显示特定的行号,可以提供逗号分隔的行号列表,在下面的例子中,第3行和第8-10行就被高亮显示:
<pre > <code data-line-numbers ="3,8-10" > <table > <tr > <td > Apples</td > <td > $1</td > <td > 7</td > </tr > <tr > <td > Oranges</td > <td > $2</td > <td > 18</td > </tr > </table > </code > </pre >
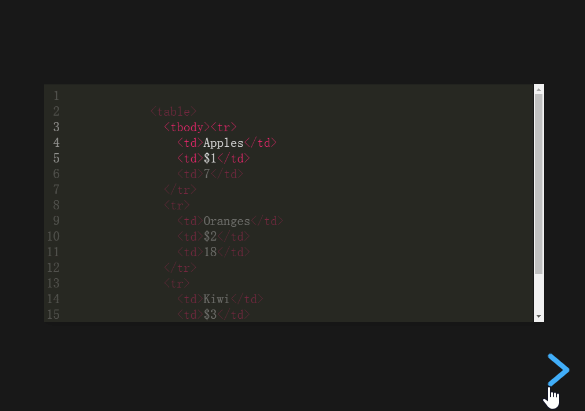
我们还可以将高亮的代码进行分步骤显示,用|分隔每一个步骤;例如下面的3-5|8-10|13-15将产生3个步骤:
1 2 3 4 5 6 7 8 9 10 11 12 13 14 15 16 17 18 19 <pre > <code data-line-numbers ="3-5|8-10|13-15" > <table > <tr > <td > Apples</td > <td > $1</td > <td > 7</td > </tr > <tr > <td > Oranges</td > <td > $2</td > <td > 18</td > </tr > <tr > <td > Kiwi</td > <td > $3</td > <td > 1</td > </tr > </table > </code > </pre >
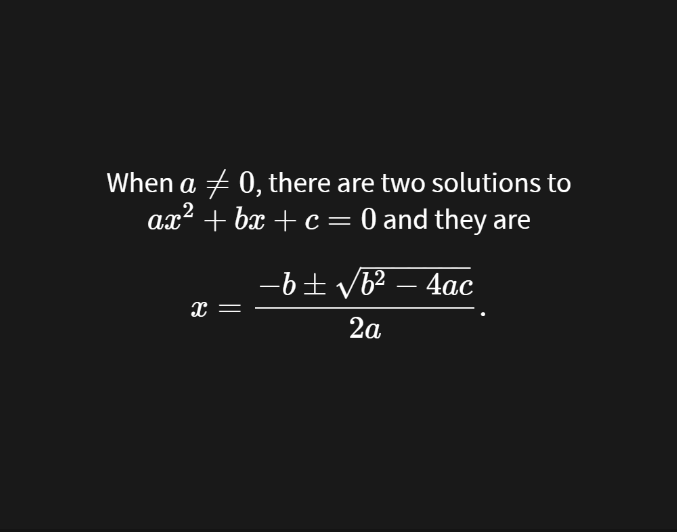
数学公式 如果我们想要幻灯片中展示数学公式,可以借助于MathJax插件轻松的实现;它是一个开源的基于 Ajax 的数学公式显示的解决方案,结合多种先进的Web技术,支持主流的浏览器;首先我们需要引入本地仓库的math.js插件和远程加载MathJax插件:
<script src ="./plugin/math/math.js" > </script > <script > Reveal .initialize ({ math : { mathjax : 'https://cdn.jsdelivr.net/gh/mathjax/mathjax@2.7.8/MathJax.js' , config : 'TeX-AMS_HTML-full' , TeX : { Macros : { RR : "{\\bf R}" } } }, plugins : [RevealMath ], }); </script >
然后我们就可以尽情使用想要的数学符号和公式了:
<div class ="slides" > <section > </section > </div >
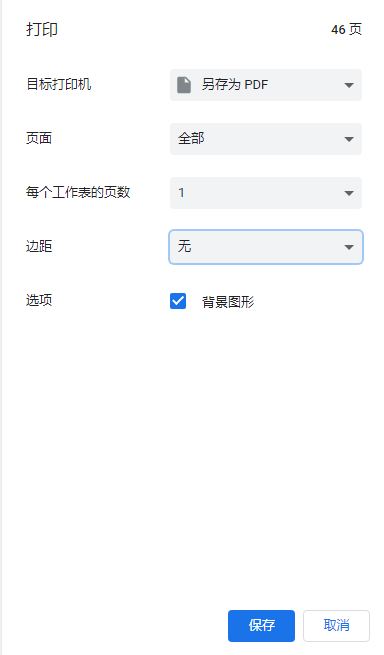
PDF导出 我们的演示文稿最后可能需要存档或者发给领导,如果直接存档项目则需要打包整个项目,别人可能也不知道怎么用;Reveal.js提供了特殊的打印样式,可以让我们将文稿导出为PDF。
首先将我们的html包含在查询字符串中,例如http://localhost:8080/index.html?print-pdf。
然后调出打印对话框 (CTRL/CMD+P)
将目标设置更改为另存为 PDF
将布局更改为横向。
将边距更改为无。
启用背景图形选项。
点击保存按钮
然后就能看到我们保存到本地的pdf文件了。